HOME | DD
 DanLuVisiArt — THE GRAIN TUTORIAL
Published: 2010-03-13 20:00:33 +0000 UTC; Views: 295907; Favourites: 8133; Downloads: 8748
Redirect to original
Description
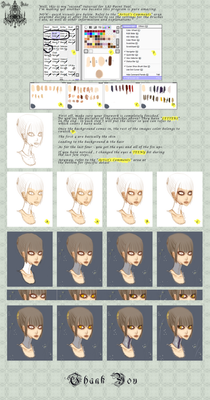
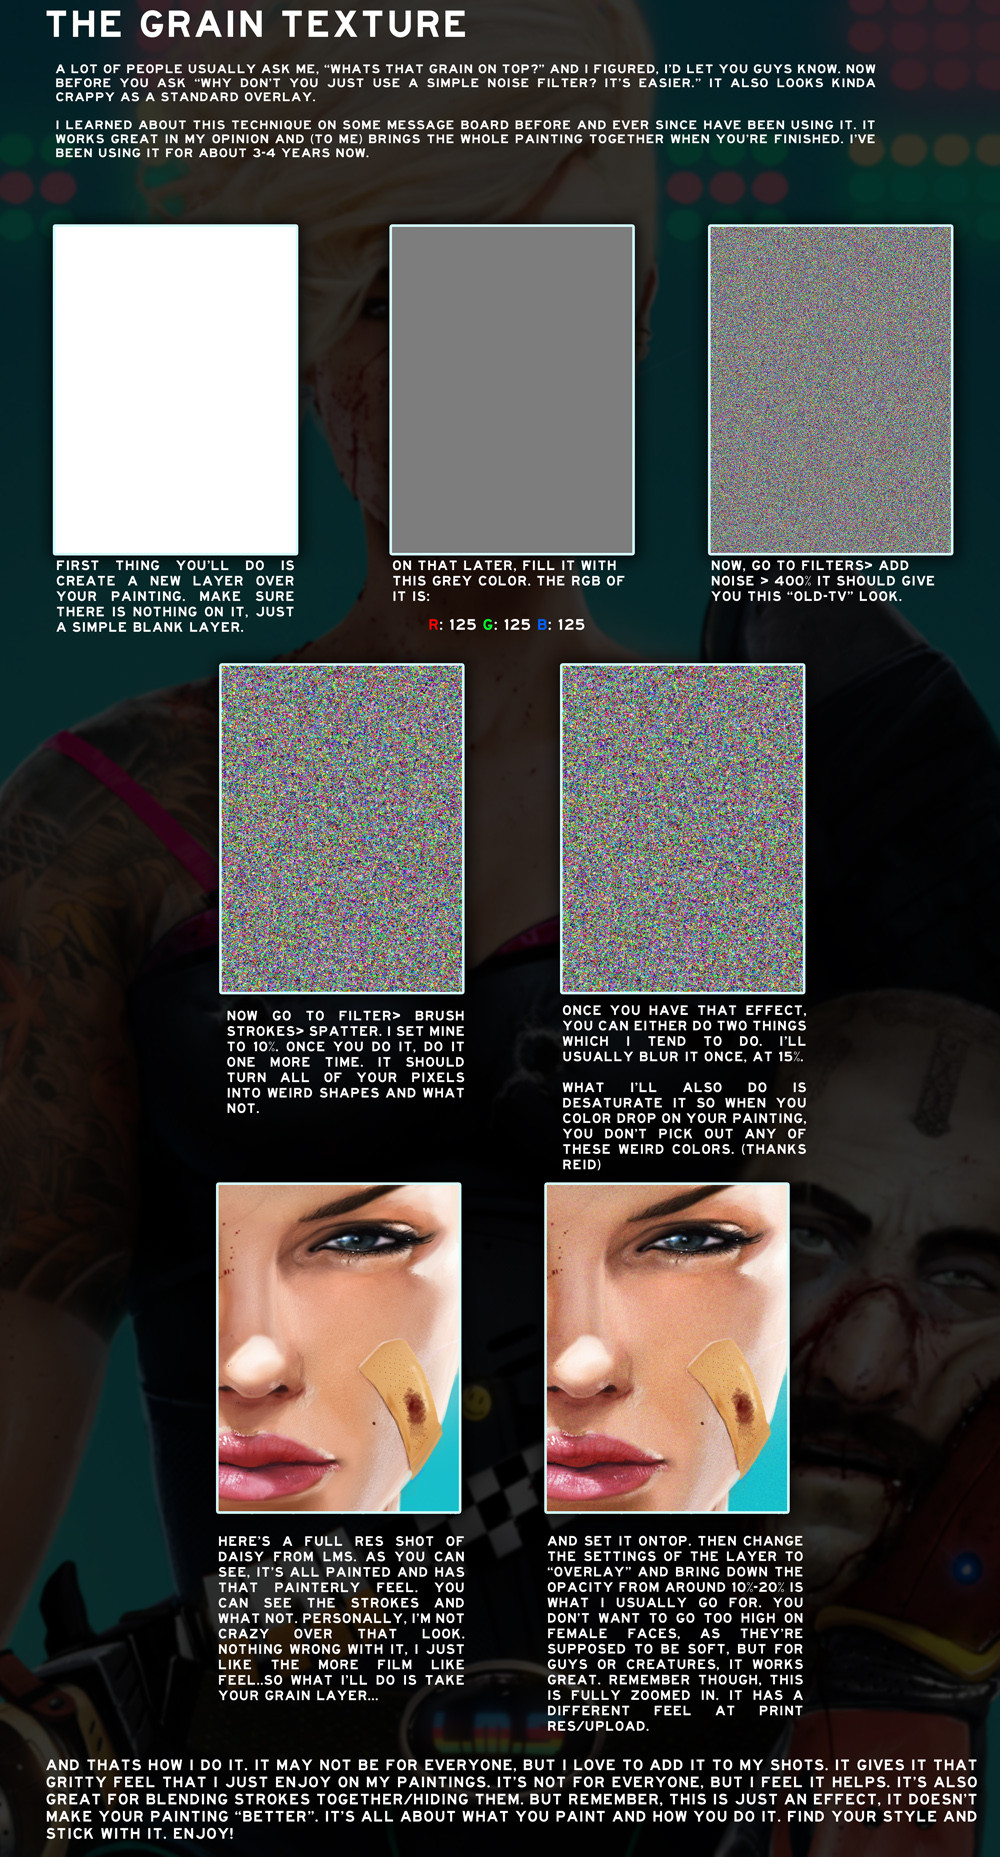
No need to explain here, it's all on the image. Just like the brushes, if this helps, please fav and support it so more people can see it. Thank you!EDIT: IMPORTANT
When you go to the BLUR step, just do a normal BLUR effect. No gaussian blur, or motion blur. Just blur. I messed up when I wrote 15%
Related content
Comments: 401

I shall use this tutorial for a fake screenshot of a vintage-style cartoon
👍: 0 ⏩: 0

When I go onto filter I can't see brush strokes, can someone help?
👍: 0 ⏩: 2

You'll have to enable it in EDIT > Preferences > Plug-ins > Tick the box which says "Show all filter Gallery and Groups"
👍: 0 ⏩: 0

Go to filter, then filter gallery. So Filter > Filter Gallery > Brush Strokes > Spatter.
👍: 2 ⏩: 0

Just want to ask does this work on SAI too?
👍: 0 ⏩: 0

Thank you! Always wanted to know this and walla! it's HERE!!
I used the technique here: fbgraphics.deviantart.com/art/…
👍: 0 ⏩: 0

Just tried this with MangaStudio5, and while I need to play around with it to adjust for the different styles of filters available, this process shows real promise. Thank you!
👍: 0 ⏩: 0

Thanks a lot for this tutorial!
Don't forget to set your image to 8-bit otherwise you won't be able to use any of the brush stroke filters!
👍: 0 ⏩: 0

I think this is Photoshop.
👍: 0 ⏩: 1

great tip! been wondering how to add more texture to my work i suffer from over blending atm so i'm working on that!
👍: 0 ⏩: 0

Wow! Nice tip! That's incredibly simple and reach such a good effect! Perfect! Thank you very much
👍: 0 ⏩: 0

thank you thank you for this, really saved my arse on an assignment pie susu dhian !
👍: 0 ⏩: 0

I have a question, any please help!! How do you do that RGB colours thing? Thanks
👍: 0 ⏩: 1

first of all. what software are you using? for photoshop by default is simple: click on your color with left mouse button
👍: 0 ⏩: 1

Yeh photoshop, then what? Also click on what colour?
👍: 0 ⏩: 1

Either you know where is vertical tools panel? by def they should be placed. left on the screen. and search for 2 overlapping color squares (by def Square Over= Black and Square underneath=White) . drag over your mouse and click on one of them and play with your colors! OR when you begin a new project- change "Color mode" drop down settings to >RGB Color<. and Voala you can use RGB colors in your new project.
👍: 0 ⏩: 1

Ok thanks so much!! But would i get the same colour if i save this picture and select the grey colour with a colour picker?
👍: 0 ⏩: 1

Thanks this is easy to follow and I can't wait to try it!
👍: 0 ⏩: 0

Thank you so much for posting this tutorial! I am brand new to digital art (art in general, really...) and I've been using regular noise filters to diffuse the 'painterly' look. I like the final look of this technique so much better, it adds a gritty realism to the skin.
👍: 0 ⏩: 0

You're my favorite deviantartist
You're the best!
Please, do more tutorials.
👍: 0 ⏩: 0

Dude who would of even thought of this!? This is crazy! Thank you for this WOW!
👍: 0 ⏩: 0

oh thank you thank you for this, really saved my arse on an assignment!
👍: 0 ⏩: 0

This is awesome! gonna try this out soon, thanks a bunch!
👍: 0 ⏩: 0

oh I see why you do it, it looks like real textures~ cool!
👍: 0 ⏩: 0

I have a problem with applying this effect. The Brush Strokes filter is greyed out and i cant apply it. Any sugestions on what to do? Thanks in advance.
👍: 0 ⏩: 0

i've been looking for this kind of texture on the skin. thank you very much sir!!! and the brushes 
👍: 0 ⏩: 0
| Next =>
